Oatmeal stands out as a versatile and nutritious option for starting the day, offering a blend of fiber, protein, and essential nutrients that can sustain energy levels throughout the morning. When prepared correctly, it provides a comforting meal that supports heart health, aids in weight management, and delivers lasting satisfaction. However, small errors in preparation can turn this wholesome dish into something less appealing or even counterproductive to health goals.
Many people overlook the importance of selecting the appropriate type of oats, which forms the foundation of any great bowl. The process begins with understanding the differences between varieties and how they impact cooking time and texture. By focusing on quality ingredients and proper techniques, anyone can elevate their morning routine.
Preparation involves more than just boiling water and adding oats; it requires attention to details like ratios and cooking methods. Avoiding common pitfalls ensures a creamy, flavorful result rather than a bland or gummy mess. With a few adjustments, oatmeal can become a highlight of the day.
Step 1: Choosing the Right Type of Oats
The first step in crafting ideal oatmeal is selecting the oats that match your desired texture and cooking time. Rolled oats, also known as old-fashioned oats, strike a balance between quick preparation and hearty consistency, making them suitable for most home cooks. They absorb liquid well without becoming mushy when cooked properly.
Steel-cut oats offer a chewier bite and nuttier flavor, ideal for those who prefer a more substantial meal, though they require longer cooking. Instant oats, while convenient, often contain added sugars and process out some natural benefits, so reserve them for rushed mornings. Always check labels to ensure you’re getting pure oats without unnecessary additives.
Experimenting with different types helps tailor the dish to personal preferences, but starting with rolled oats provides a reliable base for beginners. This choice influences everything from cooking duration to final mouthfeel. Getting this right sets the stage for success.
Why Type Matters for Nutrition
Different oat varieties retain varying levels of bran and germ, affecting their glycemic index and fiber content. Steel-cut options generally have a lower glycemic impact, helping stabilize blood sugar. Rolled varieties still offer solid nutrition but cook faster, appealing to busy schedules.
Step 2: Measuring Ingredients Accurately
Accurate measurement prevents imbalances that lead to undesirable textures. A standard ratio of one part oats to two parts liquid creates a creamy consistency without excess wateriness. Adjust slightly based on oat type, as steel-cut may need more liquid.
Use measuring tools rather than estimating to maintain consistency across batches. This precision ensures the oats absorb just enough moisture to plump up nicely. Over time, this habit builds confidence in the kitchen.
Incorporate add-ins like fruits or nuts after cooking to avoid altering the base ratio. This step keeps the focus on the oats themselves. Proper measuring transforms a simple process into a reliable one.
Adjusting for Personal Taste
Some prefer thicker oatmeal, which calls for reducing liquid slightly, while others enjoy a soupier version with extra fluid. Test small variations to find your ideal balance. Remember, additions like milk can thicken the mixture as it cools.
Step 3: Selecting the Best Liquid Base
Choosing the right liquid enhances flavor and nutrition beyond plain water. Milk or plant-based alternatives like almond or oat milk add creaminess and subtle taste. Combining water and milk offers a lighter yet rich option.
Avoid using only water unless aiming for a minimalist approach, as it can result in a flat profile. Experiment with broth for savory versions, though sweet breakfasts benefit most from dairy or non-dairy milks. This choice elevates the overall experience.
Heat the liquid before adding oats to speed up cooking and improve absorption. This technique ensures even cooking throughout. Selecting wisely here makes a noticeable difference.
Benefits of Different Liquids
Milk provides protein and calcium, boosting the meal’s satiety factor. Plant milks cater to dietary restrictions while adding unique flavors. Water keeps calories low for those monitoring intake.
Step 4: Mastering the Cooking Method
Stovetop cooking allows control over heat and stirring, yielding superior texture. Bring liquid to a simmer before adding oats to prevent clumping. Maintain a gentle boil to cook evenly without scorching.
Microwave options work for speed, but stir midway to avoid uneven heating. Slow cooker methods suit overnight preparation, infusing deeper flavors. Choose based on time available and desired outcome.
Avoid high heat, which can lead to sticking or overcooking. Low and slow often produces the best results. This step is crucial for achieving creaminess.
Tips for Different Cooking Tools
For stovetop, use a heavy-bottomed pot to distribute heat evenly. In microwaves, use a large bowl to prevent overflow. Slow cookers require less monitoring but more planning.
Step 5: Timing the Cook Properly
Timing varies by oat type, with rolled oats needing about five minutes and steel-cut up to thirty. Set a timer to avoid under or overcooking. Stir occasionally to check progress.
Remove from heat when oats reach desired tenderness, as they continue to thicken off the stove. This prevents a dry or mushy result. Practice refines this skill over time.
Consider altitude and humidity, which can affect cooking duration. Adjust accordingly for consistent outcomes. Proper timing ensures optimal texture every time.
Signs of Perfect Doneness
Oats should be soft but retain some bite, with liquid mostly absorbed. A creamy appearance signals readiness. Taste testing helps confirm.
Step 6: Stirring Techniques for Ideal Texture
Stir gently and infrequently to maintain structure without breaking down oats excessively. Over-stirring releases starches, creating gumminess. Use a wooden spoon for best control.
Start stirring after adding oats to distribute evenly, then reduce frequency. This preserves a pleasant mouthfeel. Mastering this avoids common texture issues.
Allow resting time post-cooking for further thickening without additional stirring. This step enhances the final product. Technique here is key.
Avoiding Over-Stirring Pitfalls
Excessive agitation leads to a paste-like consistency. Minimal intervention yields better results. Observe and adjust based on visual cues.
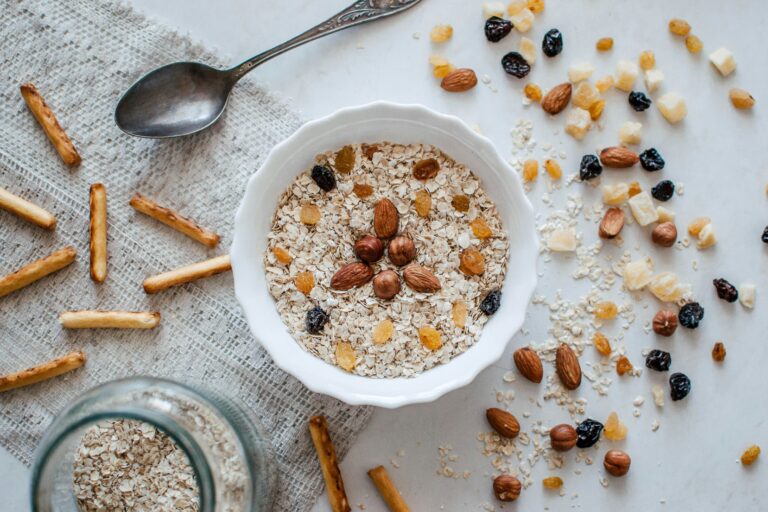
Step 7: Enhancing with Healthy Add-Ins
Incorporate fresh fruits, nuts, and seeds for natural sweetness and crunch. These add nutrients without relying on processed sugars. Layer them thoughtfully for balanced bites.
Spices like cinnamon or nutmeg provide warmth and depth. Use in moderation to complement rather than overpower. This elevates nutrition and enjoyment.
Avoid overloading, which can dilute flavors. Start small and build up. Creative combinations keep things interesting.
Nutrient-Boosting Options
Berries offer antioxidants, while nuts provide healthy fats. Chia seeds add omega-3s. Mix for comprehensive benefits.
Step 8: Seasoning for Flavor Balance
A pinch of salt enhances natural flavors, countering blandness. Add during cooking for even distribution. This simple addition transforms the dish.
Experiment with vanilla or cocoa for variety. Balance sweet and savory elements. Proper seasoning makes oatmeal crave-worthy.
Avoid excess, which can overwhelm. Taste and adjust gradually. This final touch perfects the bowl.
Sweet and Savory Ideas
Sweet versions benefit from honey or maple. Savory can include herbs or cheese. Versatility shines here.
- Rolled oats versatility: These oats cook quickly and absorb flavors well, making them ideal for beginners. They provide a smooth texture that pairs with various toppings. Incorporating them regularly supports digestive health through soluble fiber.
- Steel-cut nutrition boost: Offering a chewier consistency, steel-cut oats retain more nutrients due to minimal processing. They take longer to prepare but deliver sustained energy. Pair with fruits for added vitamins.
- Instant oats convenience: While faster, choose unsweetened varieties to control additives. They suit on-the-go lifestyles but may lack the depth of other types. Enhance with fresh ingredients for better nutrition.
- Liquid ratio precision: Maintaining the correct balance prevents sogginess or dryness. This ensures oats plump properly during cooking. Adjusting for milk versus water affects creaminess.
- Topping health focus: Opt for nuts and seeds over sugary items to add protein and fats. This promotes satiety and balanced meals. Variety keeps breakfast exciting.
- Cooking vessel choice: Non-stick pots ease cleanup and prevent burning. Size matters to avoid overflow. Material influences heat distribution.
- Timing accuracy: Monitoring closely avoids overcooking, preserving texture. Different oats require specific durations. This step is essential for consistency.
- Stirring moderation: Gentle handling maintains integrity. Overdoing it leads to unwanted gumminess. Technique refines with practice.
Pro Tips
For creamier oatmeal, toast oats in a dry pan before adding liquid to enhance nutty flavors. This quick step intensifies taste without extra ingredients. It’s especially effective for rolled varieties.
Prepare batches in advance and refrigerate for grab-and-go meals, reheating with a splash of milk. This saves time during busy weeks. Customize portions for individual needs.
Incorporate protein sources like Greek yogurt or eggs for a more filling breakfast. This balances macronutrients effectively. It supports muscle maintenance and energy levels.
Use seasonal fruits to keep flavors fresh and varied throughout the year. This adds natural sweetness economically. It also boosts vitamin intake.
Experiment with international twists, like adding coconut milk and mango for a tropical vibe. This expands culinary horizons. It prevents monotony in routines.
Frequently Asked Questions
Can oatmeal be prepared without cooking? Yes, overnight oats soak in liquid refrigerated, softening without heat. This method preserves nutrients and offers convenience. Add yogurt for extra creaminess.
How do I fix gummy oatmeal? Reduce stirring and ensure proper liquid ratios next time. For current batches, add more liquid and reheat gently. Prevention is key through practice.
Is oatmeal suitable for gluten-free diets? Pure oats are gluten-free, but check for cross-contamination. Certified options ensure safety. They provide a hearty alternative.
What if my oatmeal is too bland? Incorporate salt, spices, or extracts during cooking. Top with flavorful add-ins. Layering builds complexity.
Can I freeze cooked oatmeal? Portion and freeze in containers, thawing as needed. This minimizes waste. Reheat with liquid to restore texture.
How long does cooked oatmeal last? Refrigerate up to five days in airtight containers. Freshen with toppings upon serving. Monitor for spoilage signs.
What’s the best way to add sweetness healthily? Use ripe fruits or a drizzle of honey. Avoid processed sugars. This maintains nutritional integrity.
Conclusion
Mastering oatmeal preparation by sidestepping common errors leads to a consistently delightful and nourishing breakfast. From selecting oats to perfecting cooking techniques, each step contributes to a superior outcome. Embracing these practices not only enhances daily meals but also supports overall well-being through better nutrition and satisfaction.
Full-stack developer at Scylla Technologies (USA), working remotely from Bangladesh. Adobe Certified Magento Developer.